| |
6/30 & 7/1/2014 - More hassles
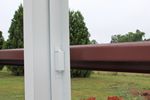
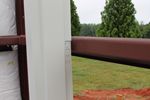
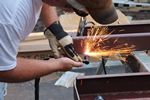
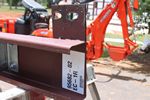
The guys showed up on Monday to overcast skies with 80% a threat of rain. I figured we could get started and try to get as much done as we could. Starting on the man door for the back of the building, we assembled the frame header to the jambs with the provided bolts. We stood the frame up and marked where we needed to cut the bottom drip rail. So far so good. There are no instructions with the door and the details on the building drawings are un-clear as to how to connect the center girt to the door frame. There are no clips so I determined that the girt must be cut and slipped inside the frame. We will then have to run screws through the frame into the girt. The plans show an RF-1 fastener, which isn't included in the 'KIT'. I don't mind having to buy a few fasteners (the door frame anchor bolts for the floor aren't included either) but there is nowhere that an RF-1 fastener is described. I suppose you are just expected to use your vast experience with metal building to determine their size. It started to rain around 10:30 so I called it a day.
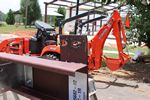
While we were discussing our strategy for Tuesday the truck arrived with the new stub columns and a pair of girts that were missing. Of course now it's raining hard. I grabbed a fresh seat cover for the LULL (30 gal trash bag) and drove out to the truck parked on the road. We got the stub columns on the LULL and when he was loading the 14 foot long girts I noticed that one end of them was smashed flat and the shipping wood was missing. There were also some serious scratches in the paint. It looked like some disgruntled Fed-Ex employee on a forklift must have run over them. I refused the girts and had him put them back on the truck. Good thing I didn't need those right away. I brought the LULL back down to the garage and parked it thinking we would now be good to assemble the carport on Tuesday.
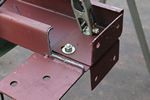
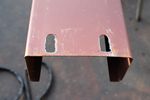
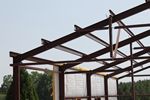
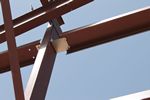
Everyone is here Tuesday morning and we start hauling parts up to attach the new stub columns. We get one bolted in place and start to add the lower girt on one side ( a C channel girt) and realize that the girt won't lay on the stub column clip because they are both C-channel and there is no clearance to fit one inside the other. We take down the new stub columns and decide that it is better to modify those by cutting the sides off where the girt goes because if we cut the girt sides the remaining tab would be too weak and might bend. I cut about 3 inches off of the sides at the bottom of both stub columns and we put them back up. The bottom girts now fit into the tabs on the bottom of the stub column. The tabs are bolted on this time instead of welded and have elongated holes for adjustment.
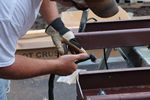
The bottom girts still aren't right. It looks like one stub column is hanging down lower than the other. After about 45 minutes of measuring (this is all 12-20 feet off the ground with a scissor lift, measure, move, re-measure, move again, very time consuming) I looked at the tabs that are welded to the roof rafters that the stub columns bolt to. The bolt holes are not centered vertically on the tabs and it appears that one of them got welded on upside down. SHIT! We decided that it was better to lower the high stub column rather than raise the low one. The solution was to remove the stub column, again, and elongate the holes where it bolts to the roof rafter tab. We had to make the holes an inch and a half longer to obtain the correct height. The tabs are pretty heavy steel and I only have 110 volt power to the plasma cutter so we cranked it up all the way and went real slow. It was almost too much for the little cutter but I got the job done. We could have used the torch but we were out of gas.
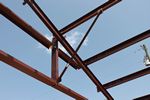
We finally got the stub columns up again and even and realized that the bolt holes for the top girt clips were in the wrong place. We ran a string line across, marked where the clips are supposed to be and pulled it all apart again so we could relocate the top clip bolt holes. I cut those right before lunch so we loaded the welding tanks into my truck and Brandon and I headed out to the welding store for gas bottles while the guys broke for lunch.
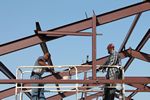
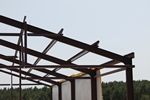
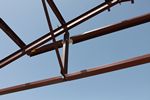
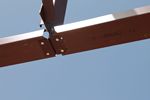
After lunch Leroy and Audifaz got back on the scissor lift and started assembly all over again. They got everything bolted up, leveled and were installing the center girts between the stub columns when we hit another snag. The bolt holes on the top girt were too close together too. This was easy, they measured the span between the clip bolt holes, lowered the girt to me and I elongated the holes in the girt by two inches. I almost ran out of girt. Back on the lift and the bolt holes aligned now. Even though everyone was dog tired and hot, we decided to go ahead and install the roof purlins so we coluld make sure the front angle braces fit. After fighting with bolt hole alignment where two purlins nest together they got the angle brace installed. They struggled some to align those bolt holes, but that pushed the front girt line out to flush with the rest of the building. Finally something was right. It was getting to be a long day, but Leroy and Audifaz labored on and installed the second purlin, bracket and angle brace. We still have some suplimental purlins to install, but they should go quick in the morning.
Tomorrow we finish the carport roof purlins and then get back to the rear door we started on on Monday. There are still more missing/wrong parts for the front wall (where the garage and other man doors are) but we have other things to do before that becomes a delay issue. WHEW, what a day. We worked for 9 hours and managed to assemble 12 pieces of steel on a short wall that should have been done a week ago.
|
|
|
|
|
|
|
|
|
Copyright (C) 2004-2014, Larry Manka. all rights reserved.
|
|